2024-03-21 17:36:02 +08:00
|
|
|
|
+++
|
|
|
|
|
|
author = "FlintyLemming"
|
|
|
|
|
|
title = "【转载】使用 Hyper-V 管理器连接 Hyper-V Server 2019"
|
|
|
|
|
|
slug = "9985f7d1e11d45288630d75892bcf368"
|
|
|
|
|
|
date = "2021-08-10"
|
|
|
|
|
|
description = ""
|
|
|
|
|
|
categories = ["Microsoft", "Windows"]
|
|
|
|
|
|
tags = ["虚拟机", "Hyper-V"]
|
2024-07-31 16:52:27 +08:00
|
|
|
|
image = "https://img.mitsea.com/blog/posts/2021/08/9985f7d1e11d45288630d75892bcf368/ryunosuke-kikuno-m6AbRqGmGCo-unsplash.avif"
|
2024-03-21 17:36:02 +08:00
|
|
|
|
+++
|
|
|
|
|
|
|
|
|
|
|
|
本篇文章虽然图片是重新截的,但是内容基本就是下面这篇文章
|
|
|
|
|
|
|
|
|
|
|
|
[Hyper-V Server 2019 安装使用记录](https://www.cnblogs.com/oloroso/p/12294966.html)
|
|
|
|
|
|
|
2024-03-21 17:41:03 +08:00
|
|
|
|
## 服务端设置
|
2024-03-21 17:36:02 +08:00
|
|
|
|
|
|
|
|
|
|
1. 开启本机远程管理
|
|
|
|
|
|
|
|
|
|
|
|
```powershell
|
|
|
|
|
|
Enable-PSRemoting
|
|
|
|
|
|
```
|
|
|
|
|
|
|
|
|
|
|
|
2. 开启 CredSSP 身份验证
|
|
|
|
|
|
|
|
|
|
|
|
```powershell
|
|
|
|
|
|
Enable-WSManCredSSP -role server
|
|
|
|
|
|
```
|
|
|
|
|
|
|
|
|
|
|
|
3. 关闭防火墙(原文这么写的,我感觉没必要)
|
|
|
|
|
|
|
|
|
|
|
|
```
|
|
|
|
|
|
netsh advfirewall set currentprofile state off
|
|
|
|
|
|
```
|
|
|
|
|
|
|
|
|
|
|
|
|
2024-03-21 17:41:03 +08:00
|
|
|
|
## 客户端设置
|
2024-03-21 17:36:02 +08:00
|
|
|
|
|
|
|
|
|
|
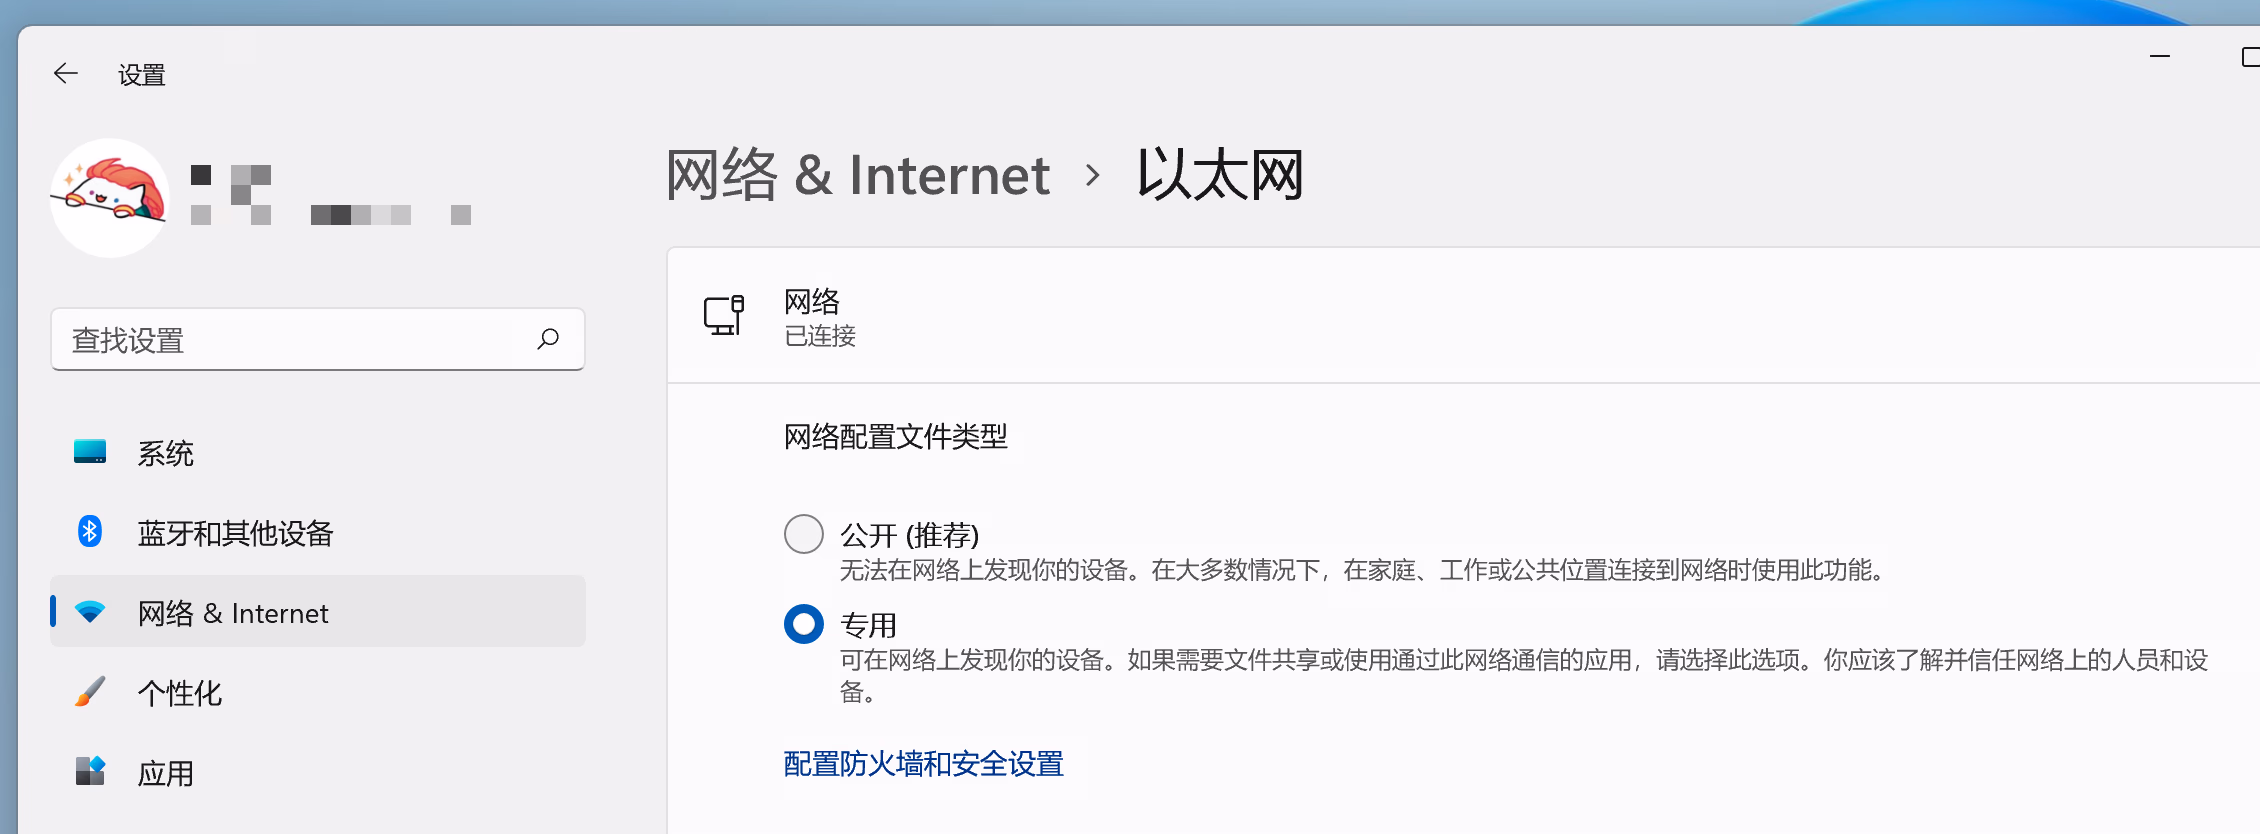
1. 将网络状态设置为专用
|
|
|
|
|
|
|
|
|
|
|
|
设置 - 网络 & Internet - 以太网
|
|
|
|
|
|
|
2024-07-31 16:52:27 +08:00
|
|
|
|
|
2024-03-21 17:36:02 +08:00
|
|
|
|
|
|
|
|
|
|
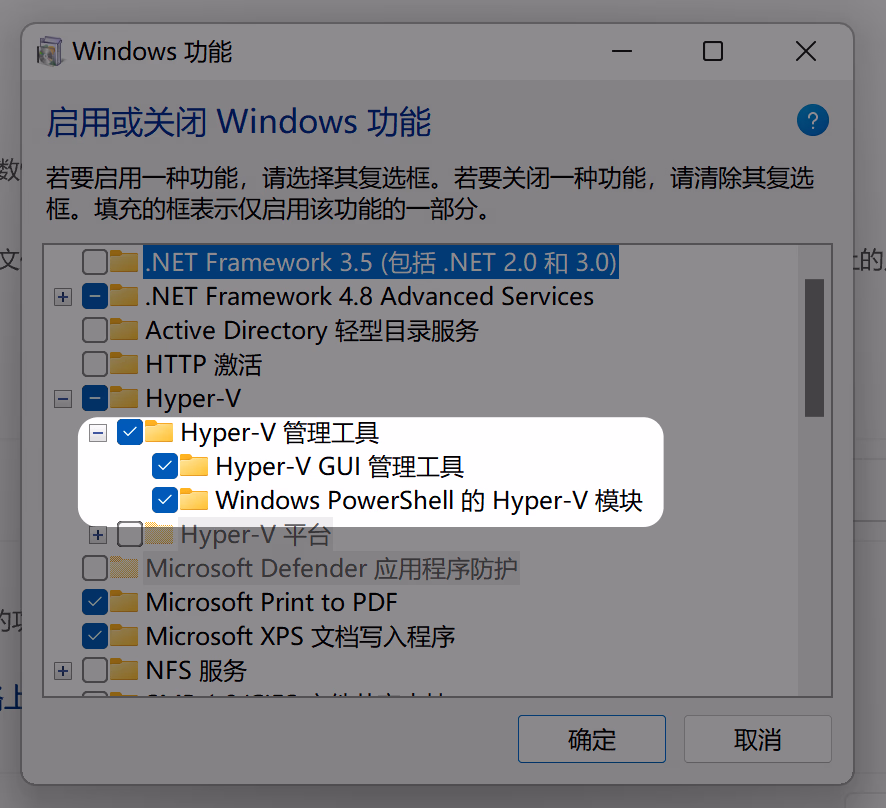
2. 启用 Hyper-V 管理工具
|
|
|
|
|
|
|
|
|
|
|
|
搜索“启用或关闭 Windows 功能”,打开
|
|
|
|
|
|
|
2024-07-31 16:52:27 +08:00
|
|
|
|

|
2024-03-21 17:36:02 +08:00
|
|
|
|
|
|
|
|
|
|
找到“Hyper-V 管理工具”,打钩,点击确定以安装功能(不需要安装 Hyper-V 平台)
|
|
|
|
|
|
|
2024-07-31 16:52:27 +08:00
|
|
|
|
|
2024-03-21 17:36:02 +08:00
|
|
|
|
|
|
|
|
|
|
3. 将 Hyper-V Server 的 IP 地址添加到 HOSTS 记录
|
|
|
|
|
|
|
|
|
|
|
|
先通过 hostname 命令查看 Hyper-V Server 主机名
|
|
|
|
|
|
|
2024-07-31 16:52:27 +08:00
|
|
|
|

|
2024-03-21 17:36:02 +08:00
|
|
|
|
|
|
|
|
|
|
修改 C:\Windows\System32\drivers\etc,追加 host 记录。在最后添加 Hyper-V Server IP 地址 + 主机名
|
|
|
|
|
|
|
|
|
|
|
|
4. 修改组策略
|
|
|
|
|
|
|
|
|
|
|
|
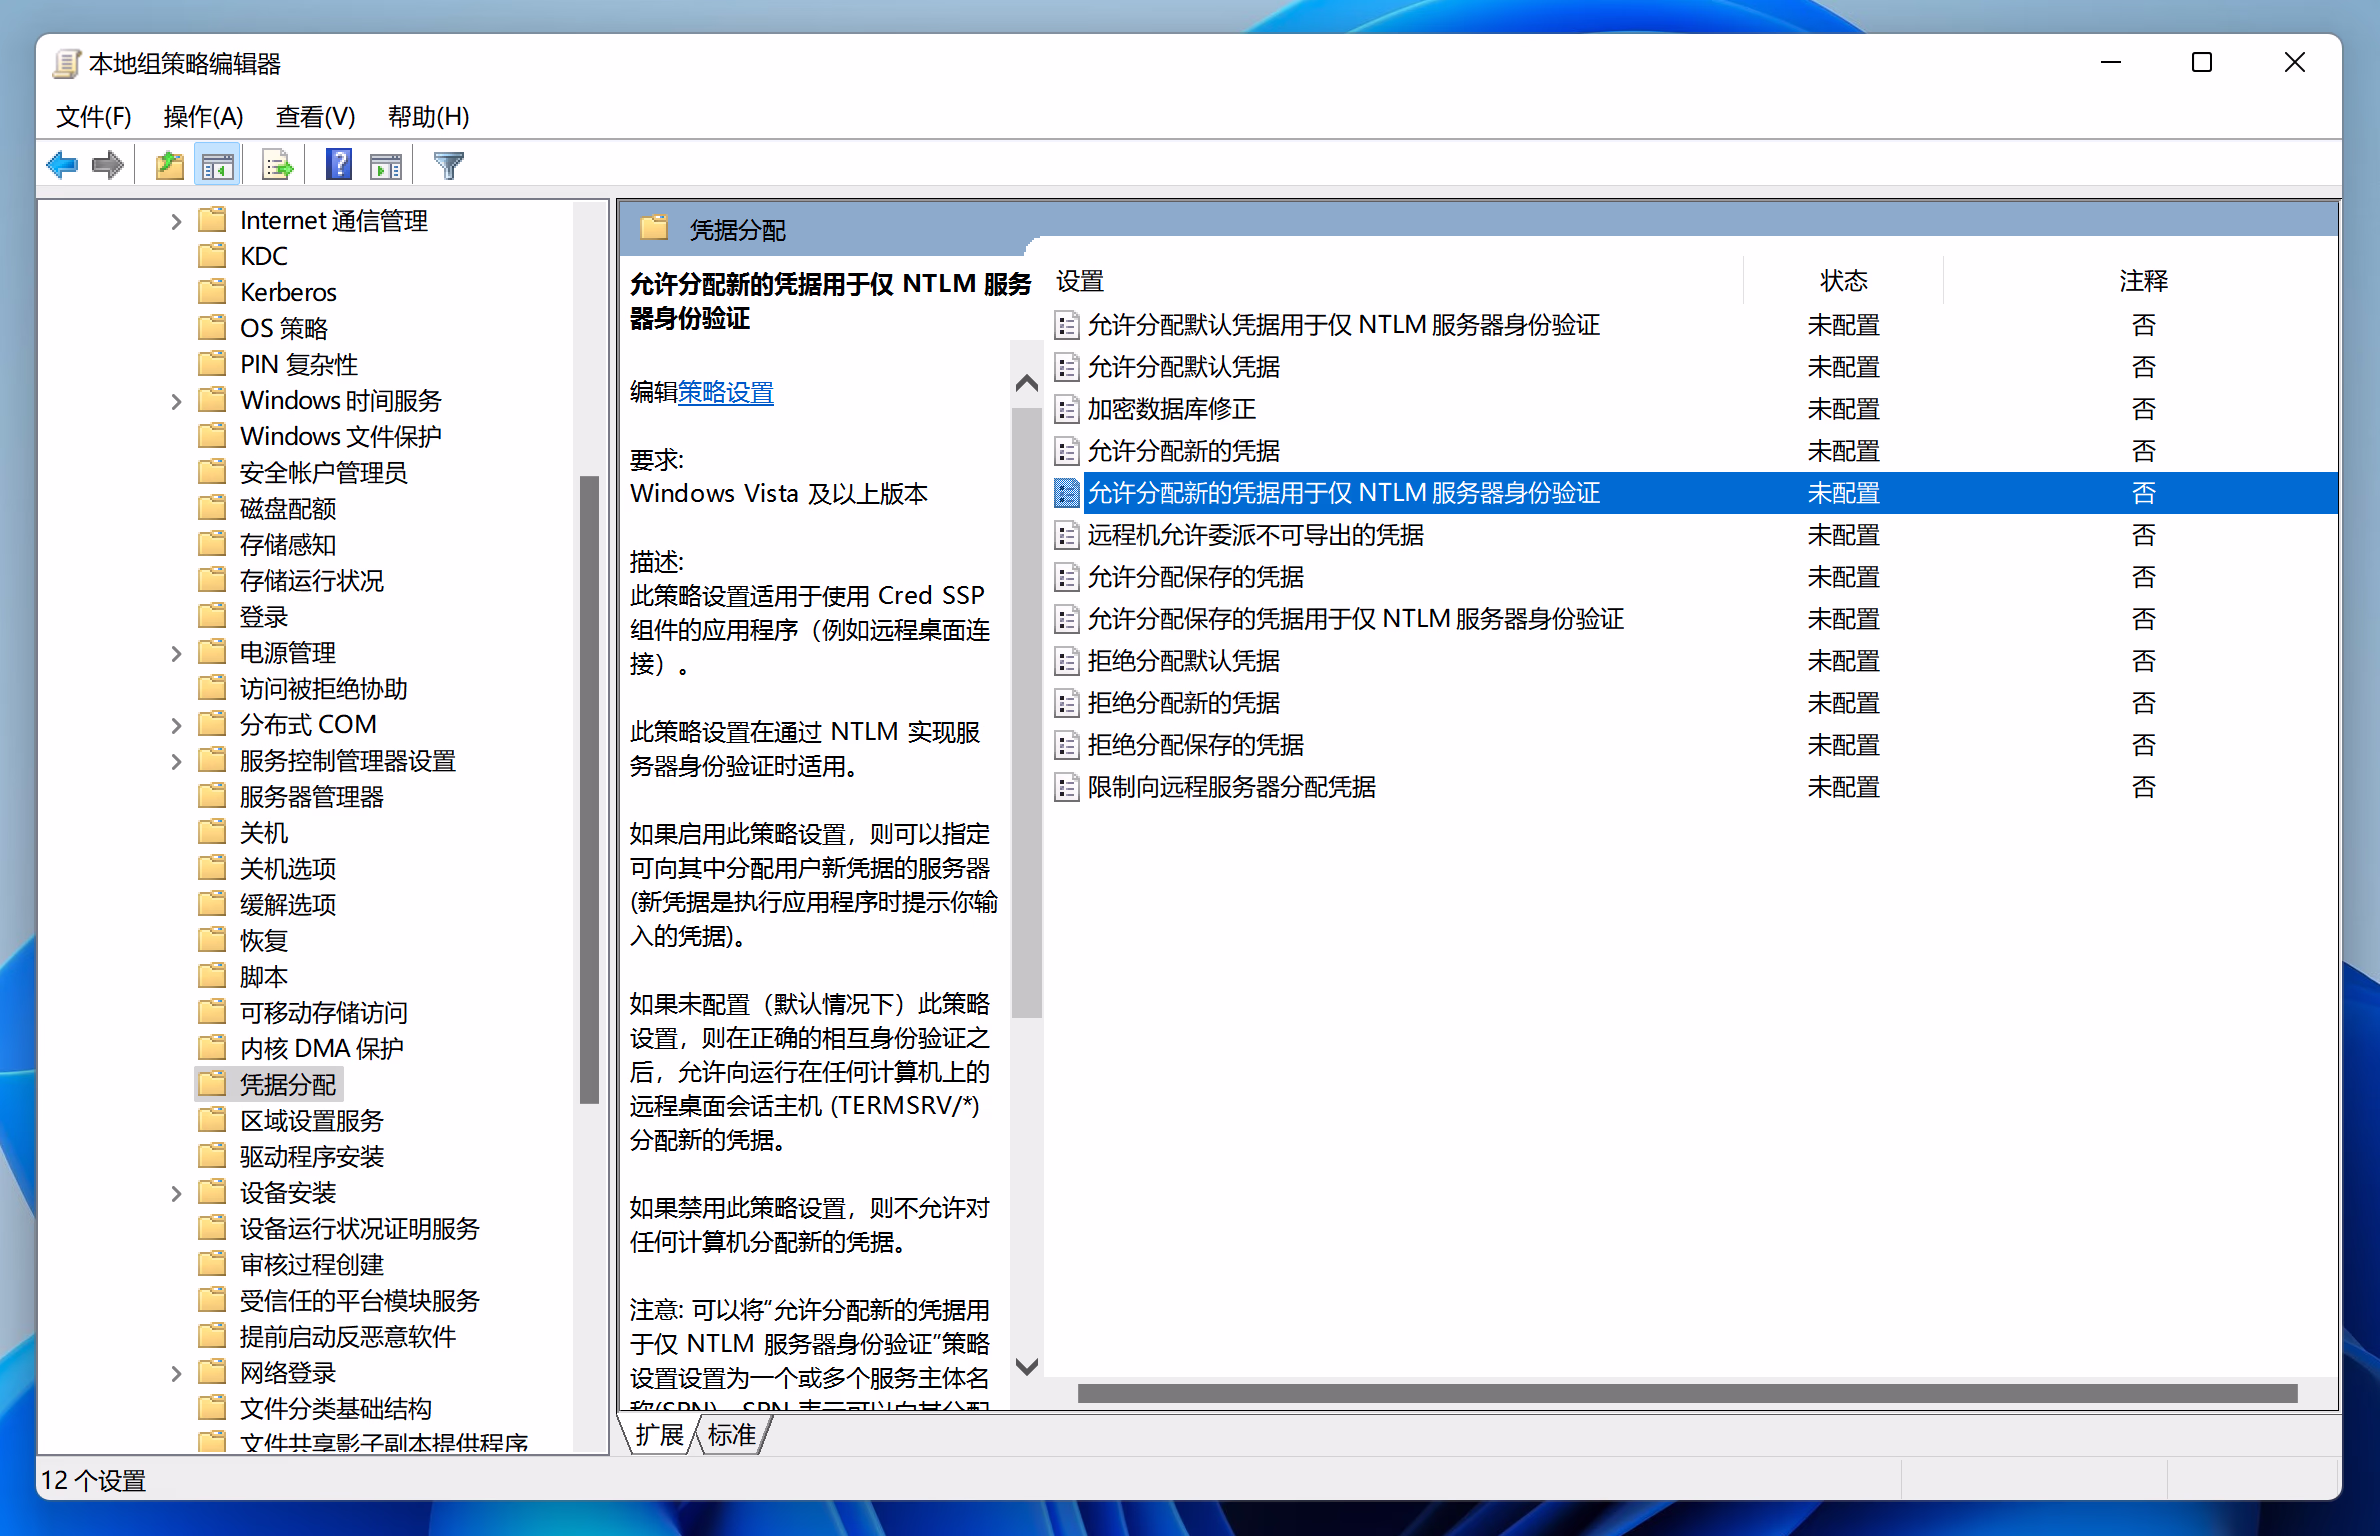
运行 gpedit.msc 程序,定位到 计算机配置 - 管理模板 - 系统 - 凭据分配 - 允许分配新的凭据用于仅 NTLM 服务器身份验证
|
|
|
|
|
|
|
2024-07-31 16:52:27 +08:00
|
|
|
|
|
2024-03-21 17:36:02 +08:00
|
|
|
|
|
|
|
|
|
|
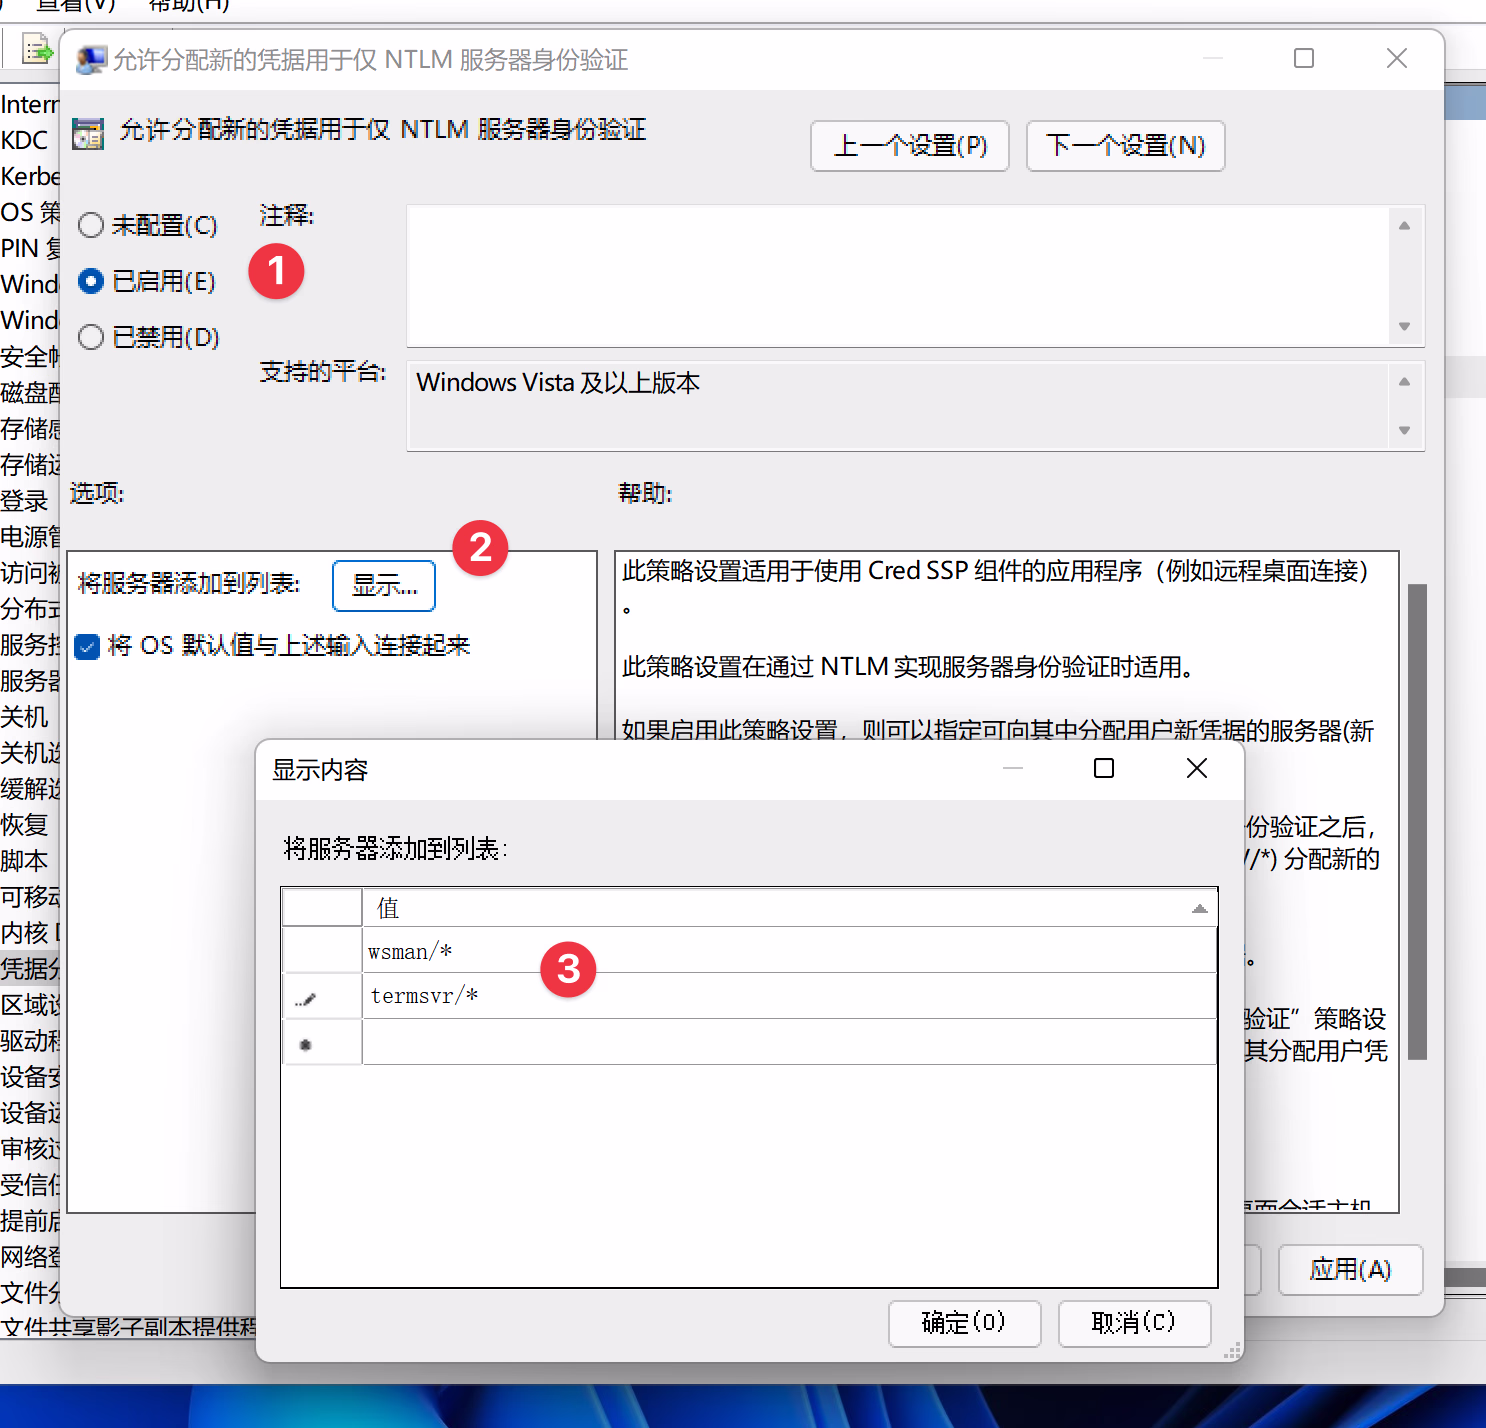
点击 已启用,然后点 显示...,添加下面两条
|
|
|
|
|
|
|
|
|
|
|
|
```powershell
|
|
|
|
|
|
wsman/*
|
|
|
|
|
|
termsvr/*
|
|
|
|
|
|
```
|
|
|
|
|
|
|
2024-07-31 16:52:27 +08:00
|
|
|
|
|
2024-03-21 17:36:02 +08:00
|
|
|
|
|
|
|
|
|
|
5. 执行 PowerShell 命令配置 WinRM
|
|
|
|
|
|
|
|
|
|
|
|
```powershell
|
|
|
|
|
|
# 开启winrm
|
|
|
|
|
|
winrm quickconfig
|
|
|
|
|
|
# winrm安全配置,最后的参数值为 Hyper-V 服务器的主机名(域名)
|
|
|
|
|
|
Set-Item WSMan:\localhost\Client\TrustedHosts -Value "MitseaCenter"
|
|
|
|
|
|
# winrm身份验证配置
|
|
|
|
|
|
Enable-WSManCredSSP -Role client -DelegateComputer "MitseaCenter"
|
|
|
|
|
|
```
|
|
|
|
|
|
|
|
|
|
|
|
6. 使用 Hyper-V 管理器连接到服务器
|
|
|
|
|
|
|
|
|
|
|
|
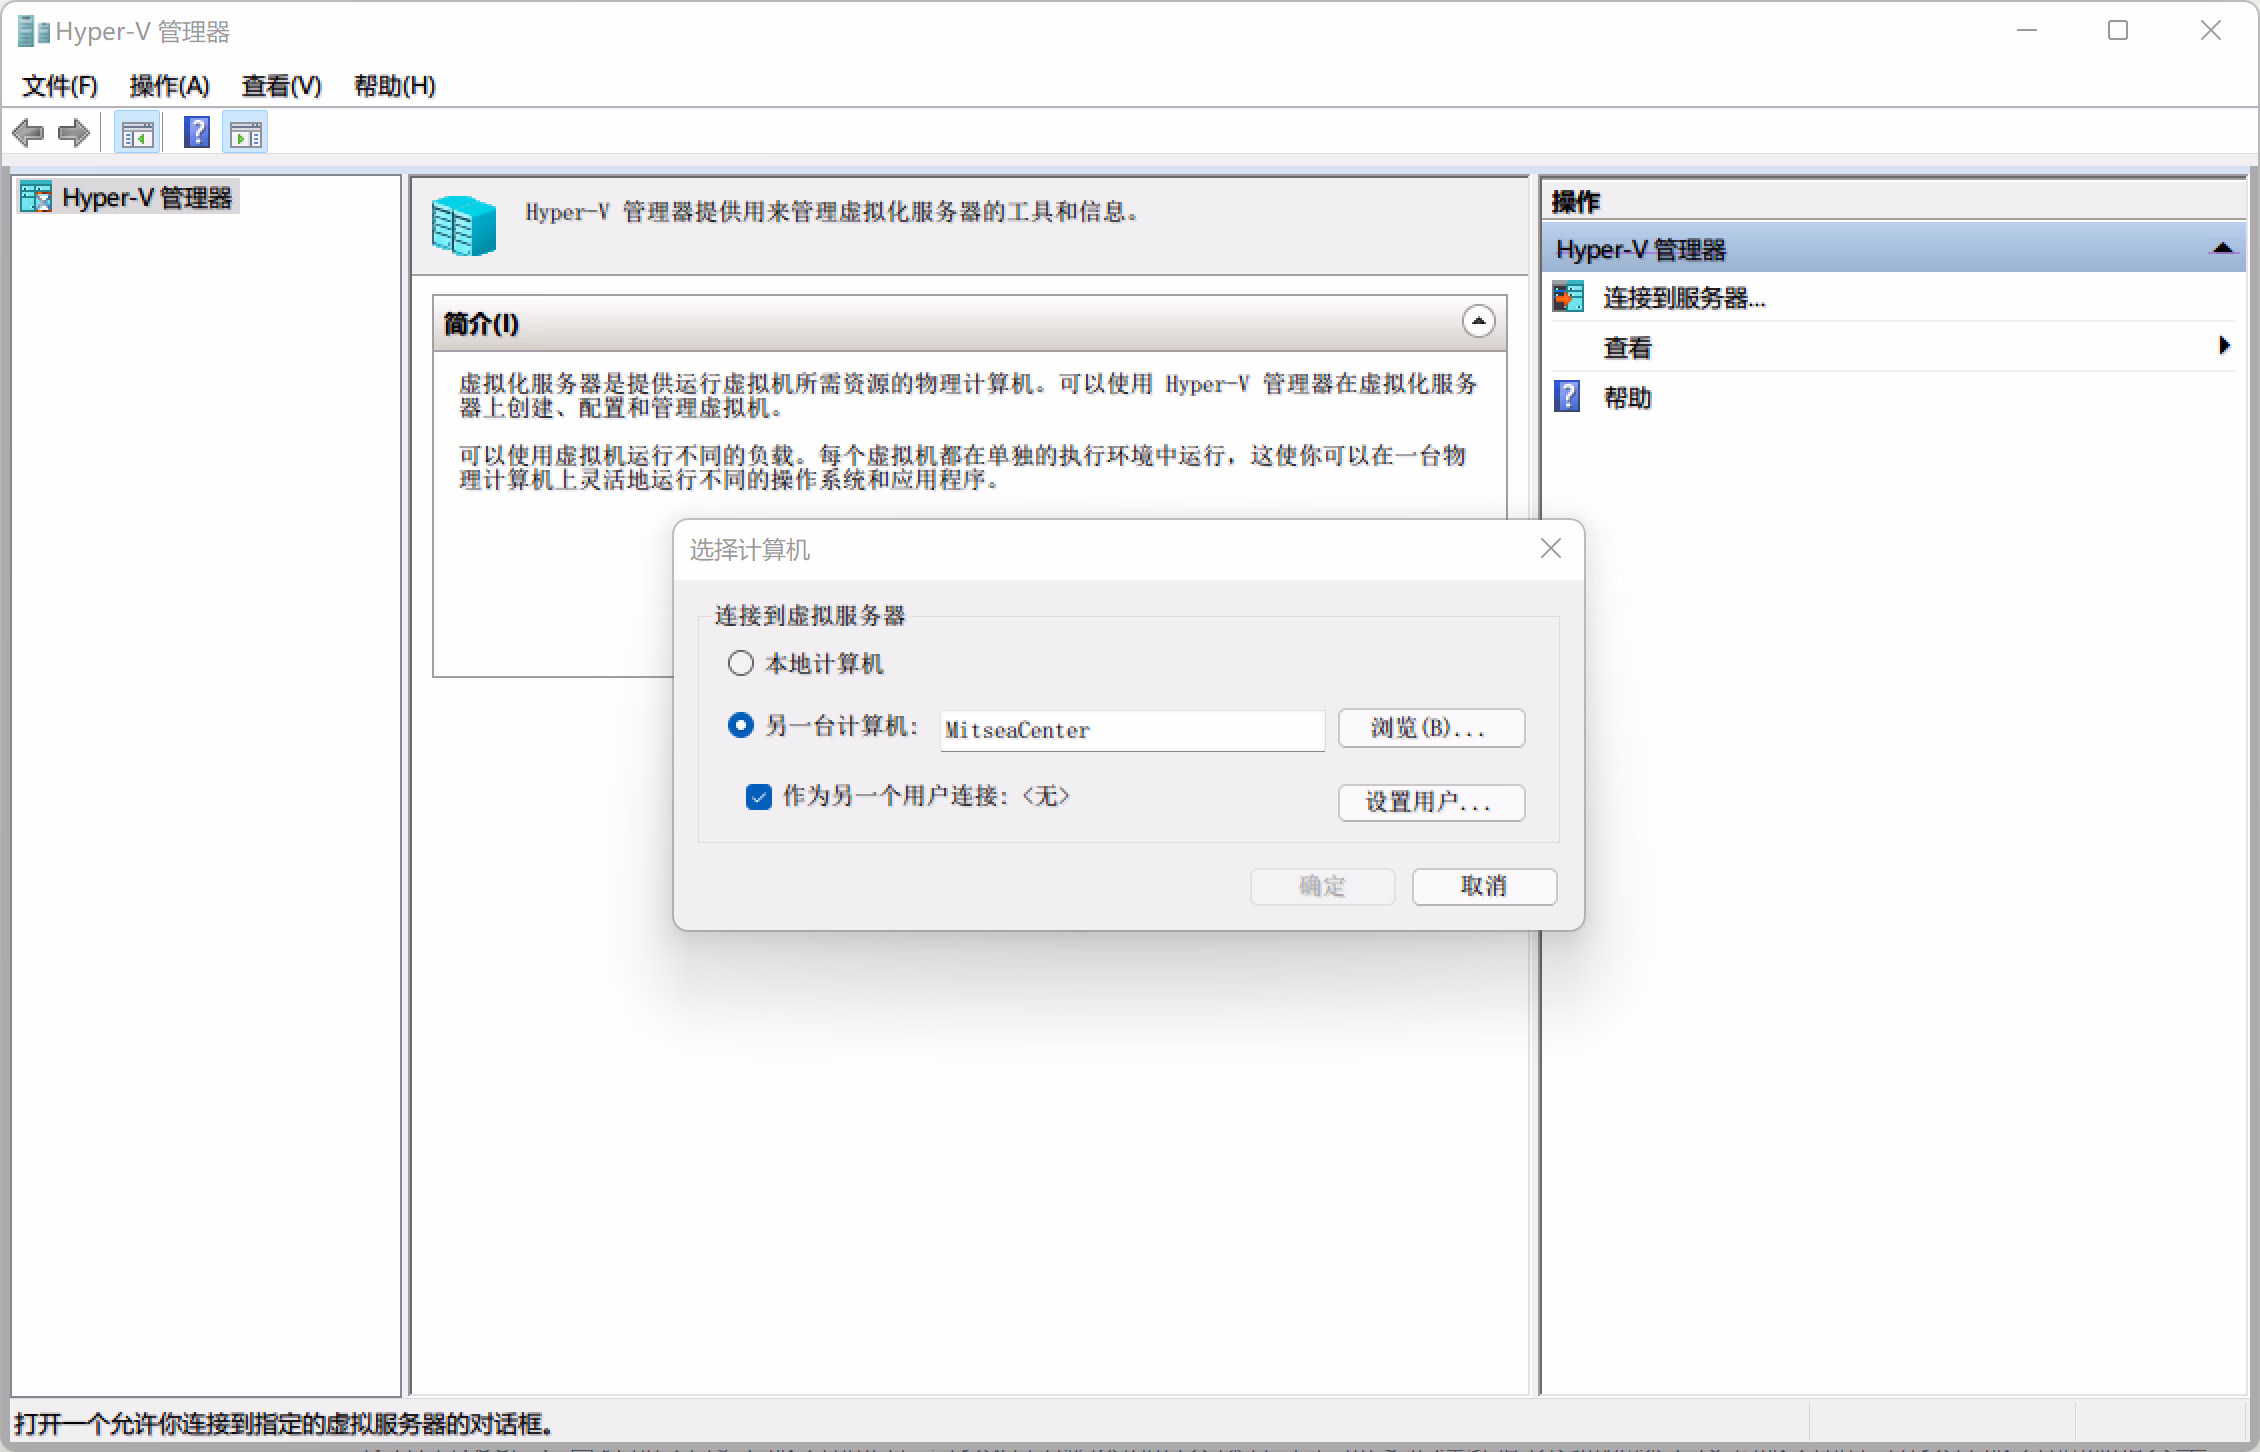
点击“连接到服务器...”,输入 Server 的 hostname,勾选“作为另一个用户连接”
|
|
|
|
|
|
|
2024-07-31 16:52:27 +08:00
|
|
|
|
|
2024-03-21 17:36:02 +08:00
|
|
|
|
|
|
|
|
|
|
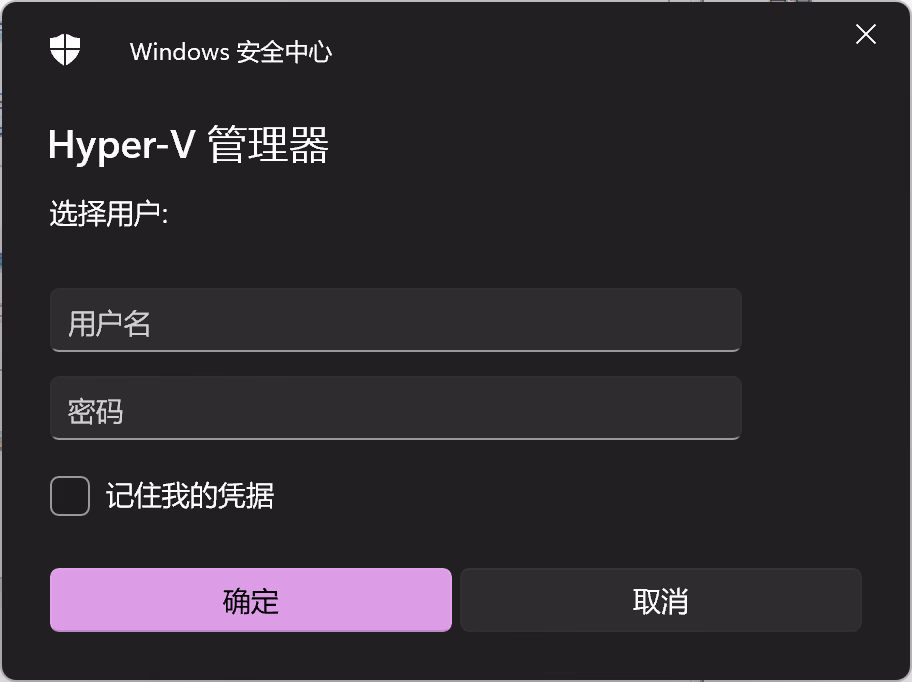
点击“设置用户...”,在弹出的窗口中,输入 Hyper-V Server 的用户名和密码。这边注意,如果 Server 没有加域,需要在名称前添加 .\,比如“.\Administrator”
|
|
|
|
|
|
|
2024-07-31 16:52:27 +08:00
|
|
|
|
|
2024-03-21 17:36:02 +08:00
|
|
|
|
|
|
|
|
|
|
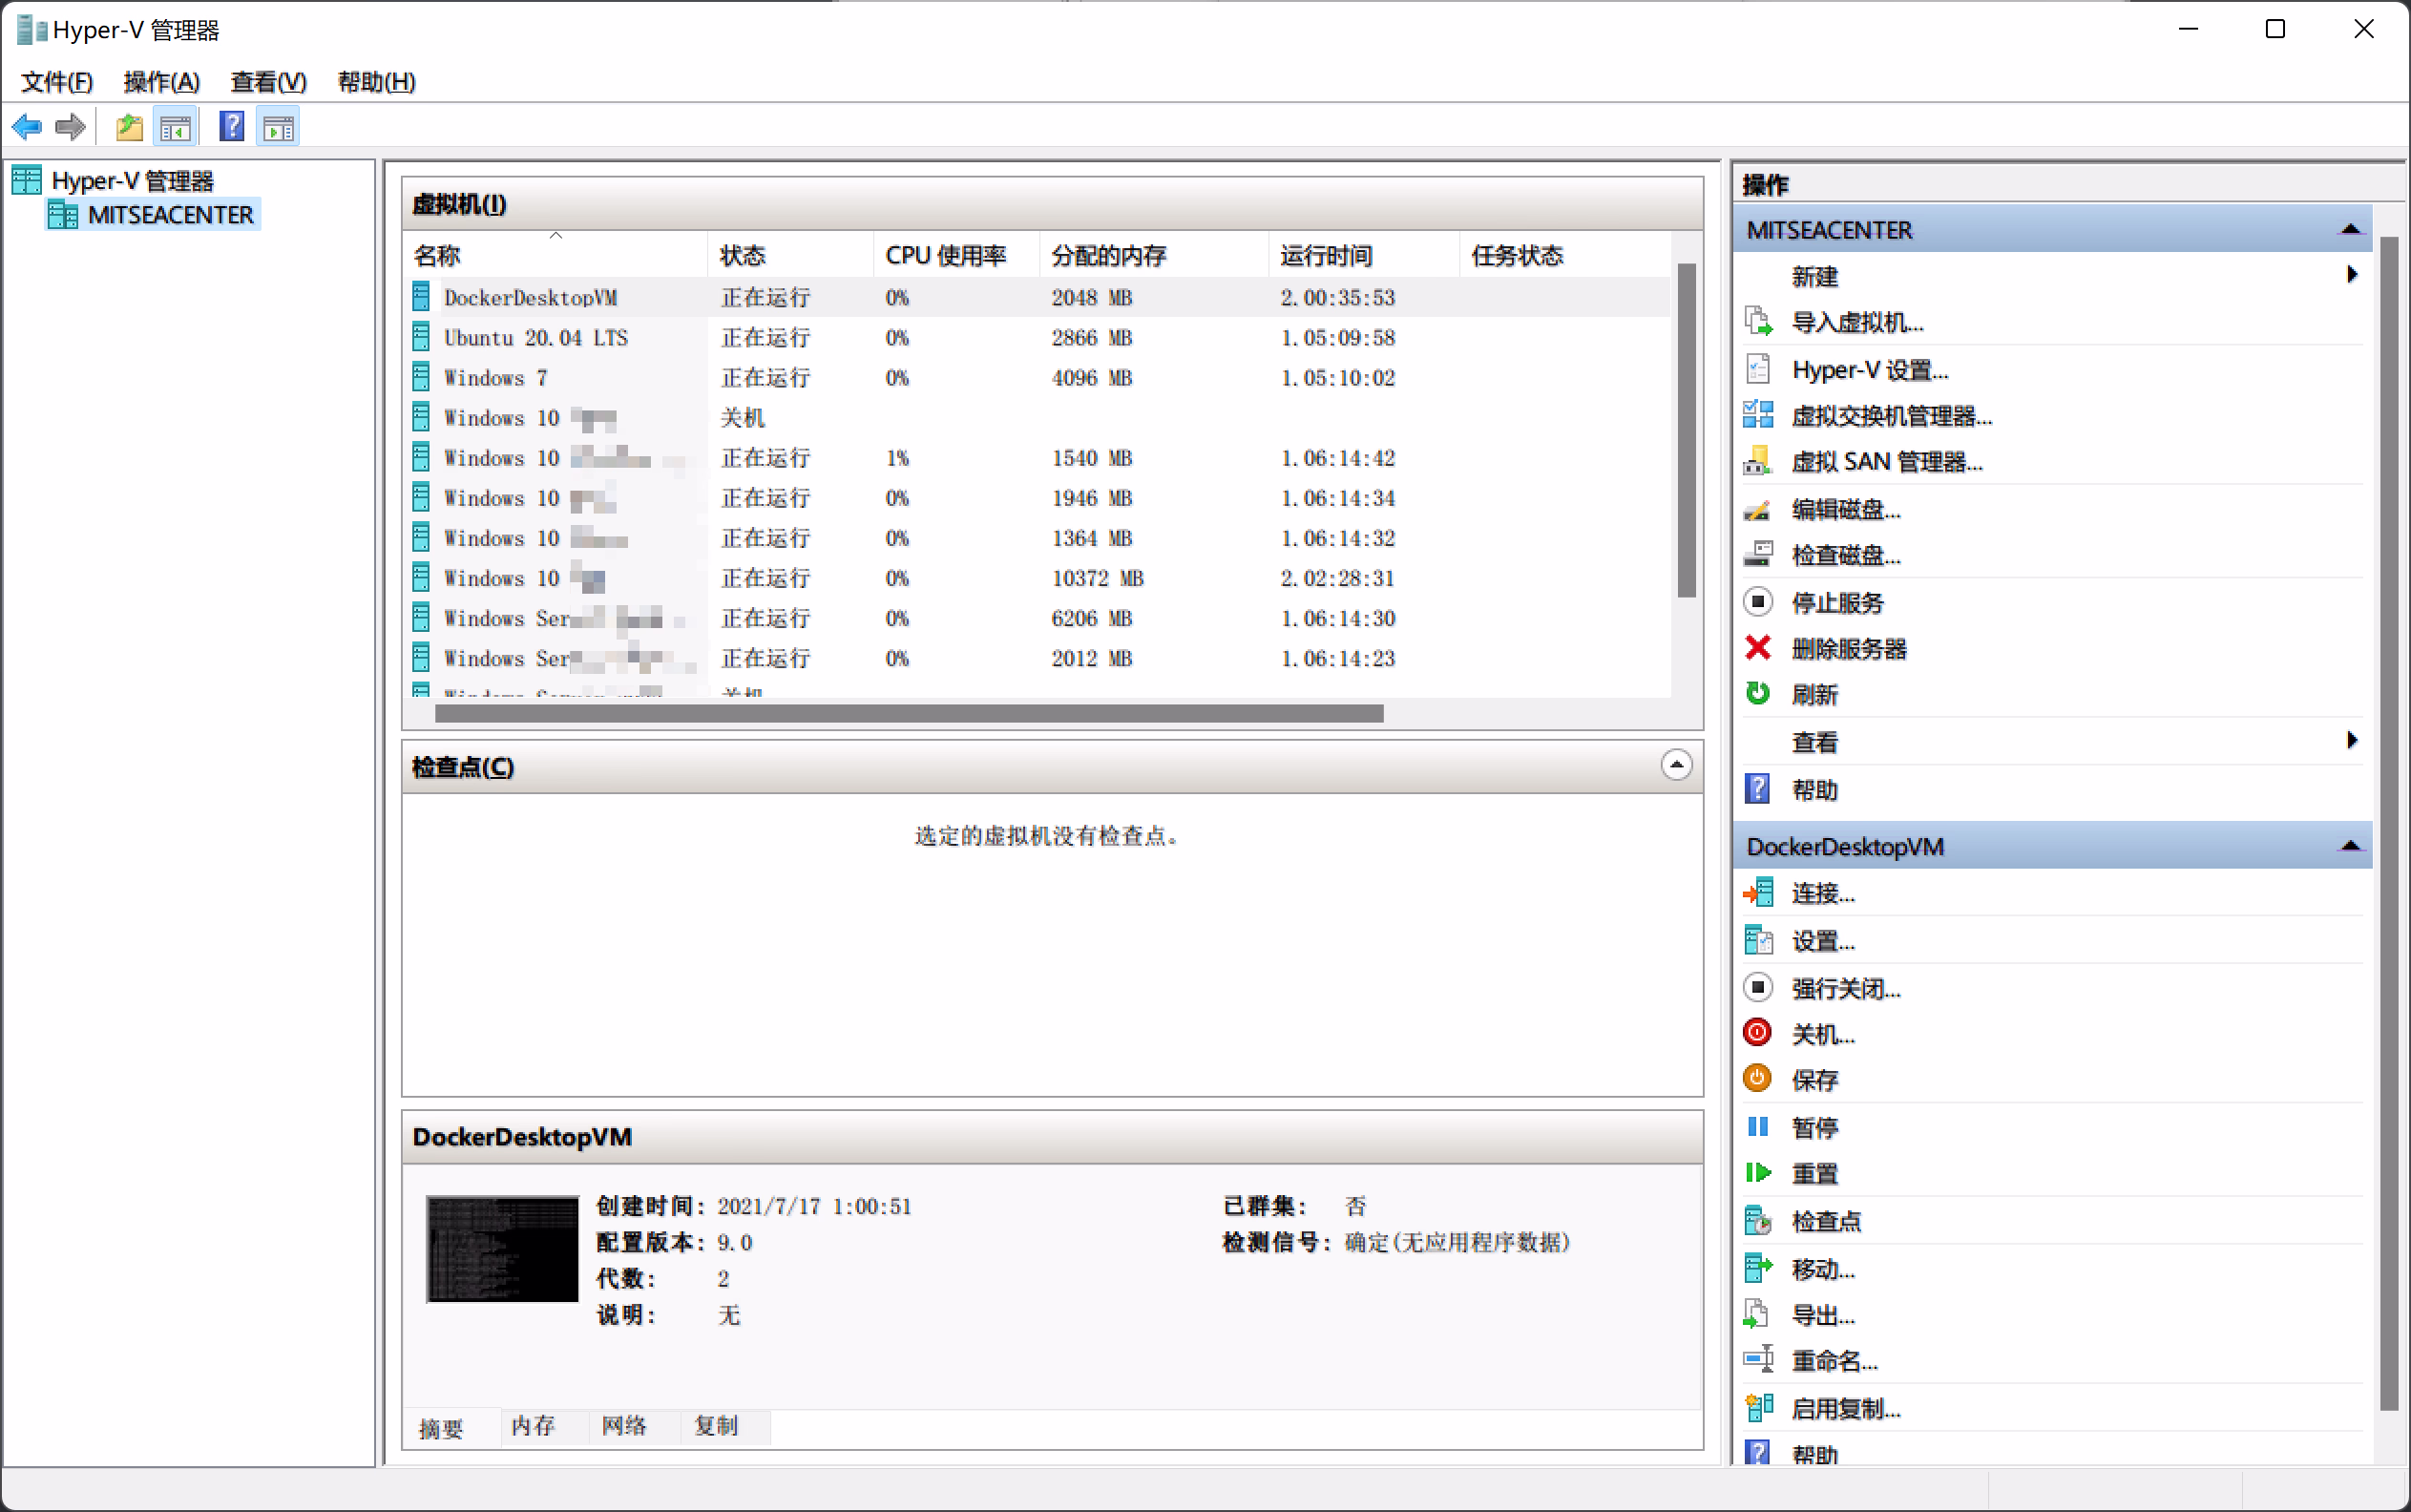
7. 链接成功
|
|
|
|
|
|
|
2024-07-31 16:52:27 +08:00
|
|
|
|
|
2024-03-21 17:36:02 +08:00
|
|
|
|
|
|
|
|
|
|
> [Unsplash](https://unsplash.com/ja/%E5%86%99%E7%9C%9F/%E7%99%BD%E3%81%84%E5%A3%81%E3%81%AB%E9%BB%92%E3%81%84%E5%9B%9B%E8%A7%92-m6AbRqGmGCo?utm_content=creditCopyText&utm_medium=referral&utm_source=unsplash)の[Ryunosuke Kikuno](https://unsplash.com/ja/@ryunosuke_kikuno?utm_content=creditCopyText&utm_medium=referral&utm_source=unsplash)が撮影した写真
|
|
|
|
|
|
|